A Guide to Amazon Lex and AWS Lambda Integration for Seamless Conversations

Hi there! I'm a passionate individual deeply fascinated by the world of cloud computing, DevOps practices, and AWS. My journey in this field is driven by an insatiable curiosity and an unyielding desire to explore and share knowledge with others.
As a dedicated cloud enthusiast, I immerse myself in the ever-evolving landscape of cloud technologies, staying up-to-date with the latest trends and advancements. I find immense joy in leveraging the power of cloud platforms, especially AWS, to design scalable and robust solutions that meet modern-day business needs.
DevOps has captured my heart with its holistic approach to software development and operations. I firmly believe in the power of collaboration, automation, and continuous improvement to streamline the software delivery process. With my strong foundation in DevOps principles, I strive to bridge the gap between development and operations teams, fostering a culture of efficiency and innovation.
One of my greatest passions lies in sharing knowledge with the community. Through blogging and engaging with fellow tech enthusiasts, I aim to demystify complex concepts, provide practical insights, and inspire others to embark on their own cloud and DevOps journeys. I'm a firm believer in the philosophy that knowledge grows when shared, and together we can build a vibrant and supportive community.
Join me on this exhilarating expedition as we unravel the intricacies of cloud technologies, dive deep into DevOps practices, and unleash the true potential of AWS. Together, let's explore, learn, and empower one another to thrive in this ever-evolving tech landscape.
Hello Learners, Hope you all have successfully built a chatbot using Amazon Lex.
If you haven't, go through Part 1, and click HERE .
In this blog, we will show, how to actually run the bot in a serverless approach. Also, we will use AWS Cloudwatch Service, to view our logs.
🎯AWS Services used:-
Amazon Lex
Aws Lambda
Amazon Cloudwatch


So let's get started.
Step - 1: Create a Python Lambda function.
Create a lambda function for our bot. I've chosen Python 3.8 version here.

Now we need to add our Python function here. As we only created order intent, I'll add only the order function here. If you have created an intent for order and cancel both, you can check the whole code here.
The code is having discounts and other stuff.
©️ Code credit goes to - Architecture Bytes
Now Just update your code as shown below. And "Deploy"

Step-2: Configure Lambda on Intent
Go to the intent, for me it is "CreateOrderIntent".

Expand the fulfillment > Click on Advanced Options > chek the box "Use a Lambda function for fulfillment" as shown above.
Then update the intent.
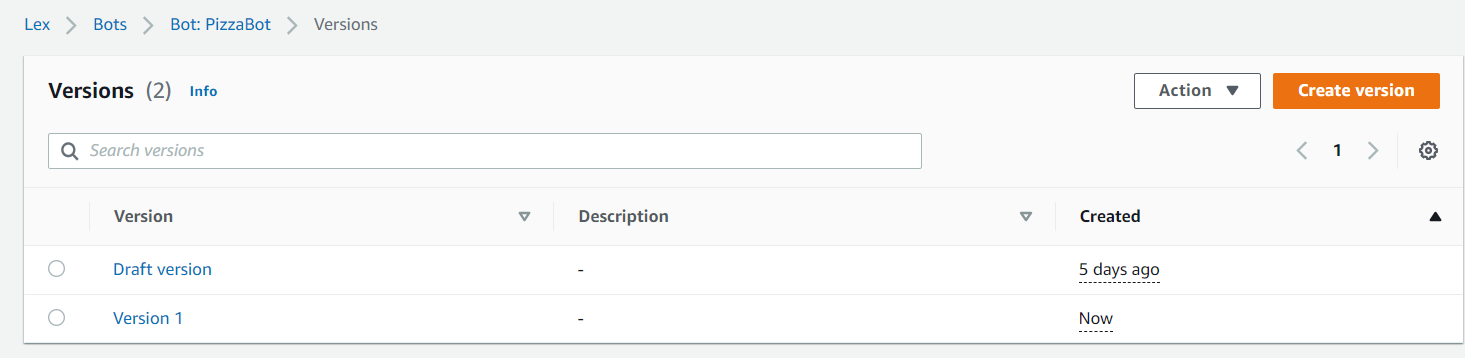
Step-3 : Create a bot version with alias (Not Mandotary)
Till now we were using the demo version, it's time to create our own version.
Move to "bot versions" and "Create version". Note, it's not a mandatory step, I added it to let you all know about it as it will help in reducing the downtime in scenarios where modification and re-deployment are required.

Then simply go down and click on "Create".
You can see, now we have our own Version 1.
Now, we will create Alias.
In Amazon Lex, an alias is a label or reference to a specific version or snapshot of a chatbot. It helps manage multiple versions of the chatbot and allows you to control which version is active or live at any given time. Aliases are useful for A/B testing, gradual updates, or maintaining different versions for different environments. By assigning an alias to a version, you can update the chatbot by publishing a new version and redirect the alias to it, without modifying integrations or endpoints.
To create an alias, follow the below steps.
Move to Alias Section > Create Alias > Give a name > Choose the version (For us it's Version 1) > Create

Now , go to our newly created alias and click on the language "English US"
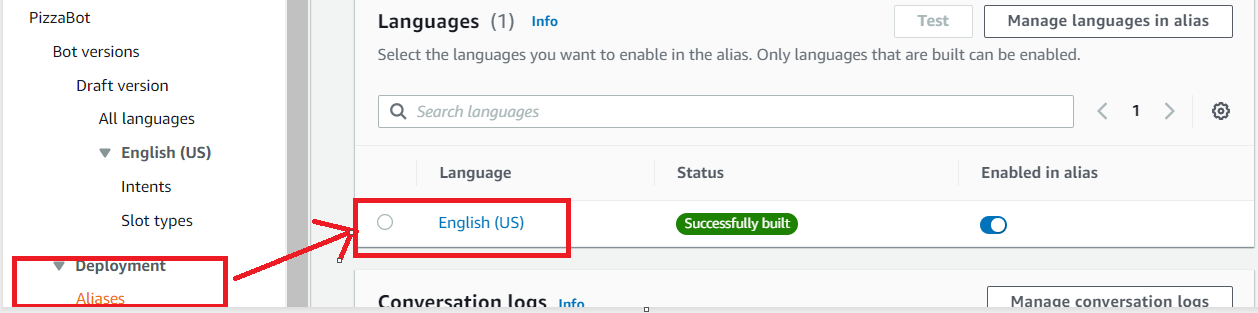
Now, in the source, give our function name and the version will be selected automatically as $Latest which is like a variable that will take the latest version always.
Click on Save.

A Snapshot of your work is saved with the lambda function active. You can use that while testing the draft version.
Now, You guys may face an issue 😶that I faced! Let's learn how to troubleshoot that also.
Troubleshoot Error :
As we all know, my purpose here extends beyond showcasing finished work. It is my genuine commitment to care for my fellow learners and our community. I encountered an error that led me to reflect on its nature and explore potential solutions.
Driven by my desire to help, I diligently troubleshooted the issue. Now, I feel compelled to share this information with all of you, ensuring that everyone is aware and equipped with the knowledge to tackle similar challenges.
So now, as already you have built the draft version, it has the lambda function integrated it may seem.
So, now if you just simply try to test, it will throw you an error like this ;
Cannot call FulfillmentCodeHook for Intent CreateOrderIntent. BotAlias/LocaleId TestBotAlias/en_US doesn't have an associated Lambda Function.
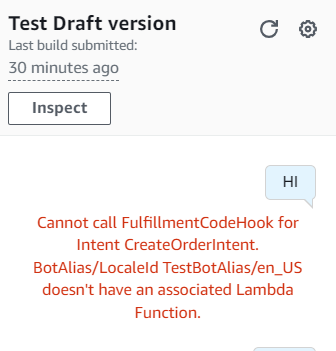
If you read the error message, it shows that our test alias still hasn't been associated with a Lambda function. Remember It's about the Test draft Alias. For version 1, we have added the source already.
To resolve the issue, we will simply associate our lambda function with this alias too, simple :).
To do this, click on the gear icon at the top right corner of the chat box.

Add the source here and "Save".

And Boooom! 🎉You can now see the output is coming as per the lambda function! 🤩😍

If we want to confirm, whether the lambda function is working or not, simply go to AWS Cloud Watch and you will see a new log group is automatically created. ✌️✌️
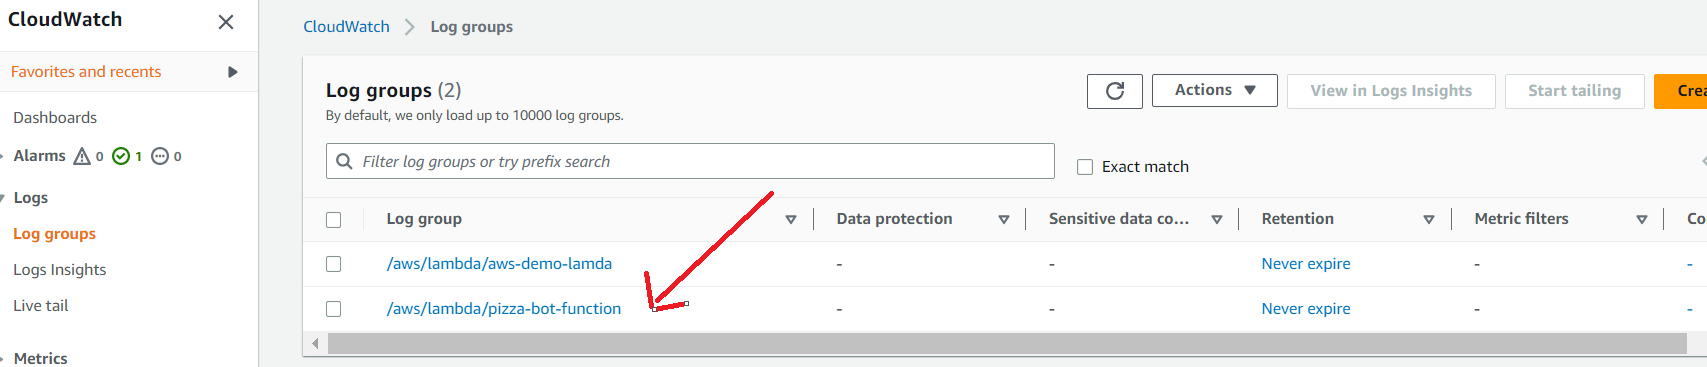
These are the logs generated for this function.

💡Any modification or contribution to this is highly appreciated.
💖 Thanks for being with me till the end. I hope that I provided you with some useful knowledge. Don't forget to spread the blog to your friends and community. 💖
Feel free to ask any more questions or for help if you need it.👍
Follow Sitabja Chatterjee for more content! ✌️