Concept :
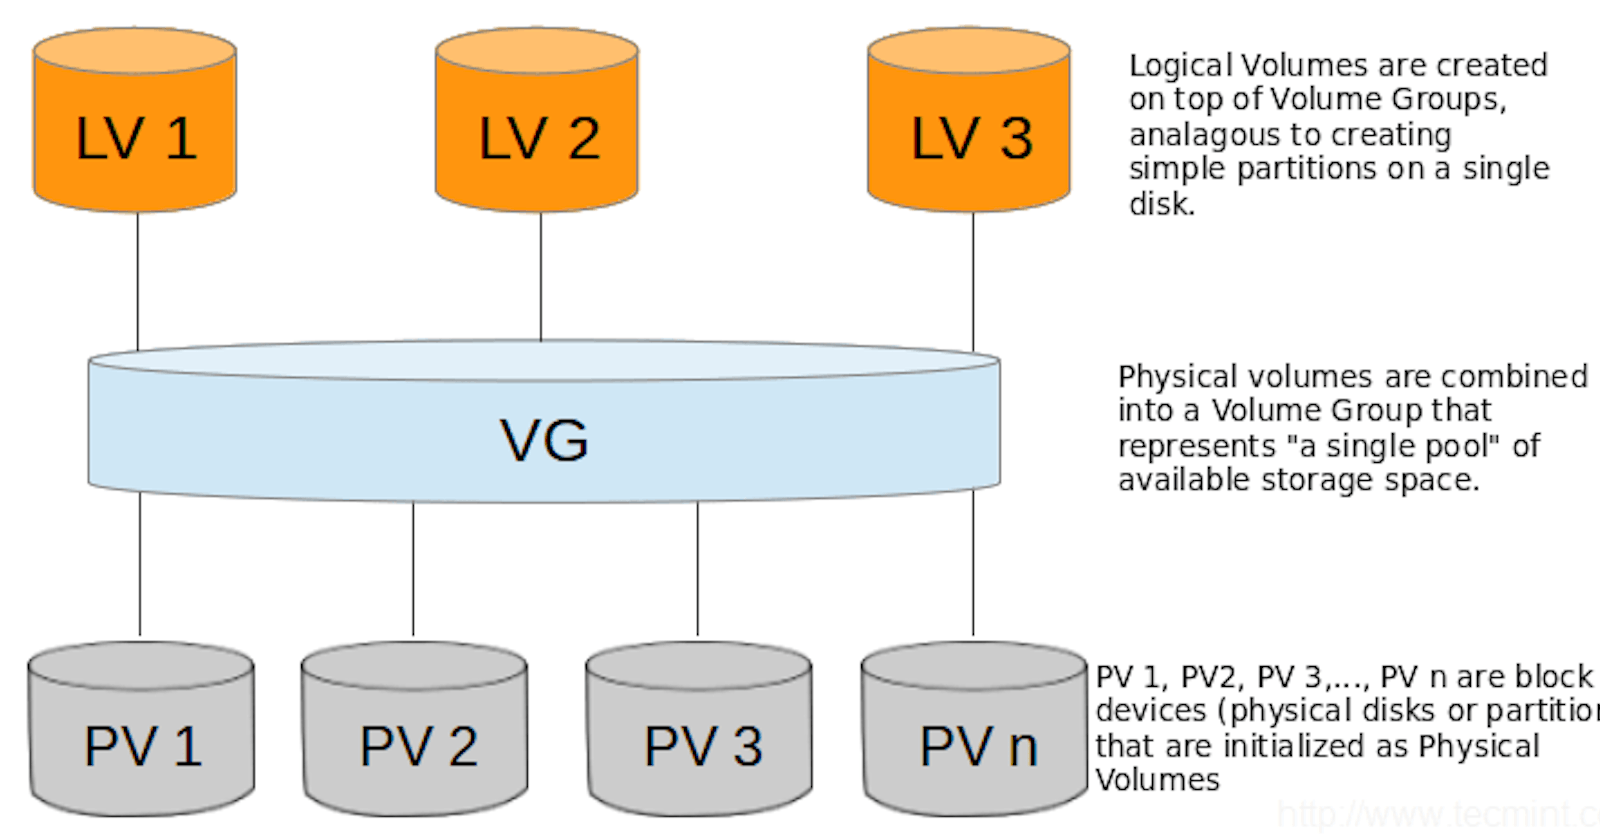
- As PV (Physical Volume) and VG (Volume Group) are techniques used by LVM, Logical volume (LV) is also a technique used by LVM. LV is the main reason why we have the physical volume and volume group in place. The idea is to make storage management easier and more flexible as we mentioned earlier. Logical volumes with various sizes can be created on a volume group.
As you can see in the above image, different PVs together made a Volume Group. The size of the VG will be the same as the addition of all the PVs.
Suppose we have 3 PV of - 5 GB, 10 GB, and 15 GB; the Size of the VG will be (5+10+15) GB = 30 GB.
In Linux, rather than counting and accepting the size of each PV, it considers the overall size of the VG and the VG acts as a 'storage pool' and then it let us create LV on top of it.
If you want to know more about LVM, let me know in the comment section! :)
Let's move on to today's topic :
Extension of Logical Volume in Linux
Step-1:
Check the current status of PV, LV, VG and disk space.
Make sure you are using "sudo".
Run the commands,
(a) lvs : to check current LV status
(b) vgs : to check current VG status
(c) pvs : to check current PV status
(d) df -hT : to check disk space usage of the file system.
(e) lsblk : to list the storage devices along with their partitions.

Step-2 :
To extend the LV, you need more space in VG(if there is not enough), and to add more space in VG, you need to add PV. And to add PV, again, you need to add a physical disk.
So, our first process will be to add a new disk. You can use various ways as per your environment. As I am using Oracle VM Virtual box, I will simply stop the server. go to storage and will add a new disk of, let's take, "5 GB" and will start the machine.
Now, after giving the "lsblk" command, you can see, a new physical disk called "sdb" of 5 GB, added to our machine.

Step-3 :
Now we have to transform the "physical disk" to "physical volume".
(a) Run command pvcreate /dev/<disk_name>
(b) Now check current PVs, with pvs command and you will see a new "Physical Volume" added.

Step-4 :
Now as physical volume is present, we have to extend our existing VG to have more space. You can extend up to* all the free space present in the new PV.
*- As here we have added 5 GB, you can extend up to 5 GB in VG, you can do an extension of 1 GB, 2GB or 5 GB, as per your requirement.
Here, we will do it for the whole 5GB.
To extend the VG,
(a) Run command vgextend <vg_name> /<pv_name>
For me, it will be vgextend ubuntu-vg /dev/sdb

As you can see, after successfully extending VG, now free space increased from 11.50 gb to 16.50 gb.
Step-5 :
As we have added space in VG, you can either create a new LV or extend the existing LV based on your requirement. As storage is added to the 'disk pool' , you can play on your own :).
Here we will do both. :)
(1) Extension of existing LV :-
To do this, we will run the command lvextend -L +<size>G /dev/<vg_name>/<lv_name> -r

As you can see in above screenshot, where, "-L" represents "length" and "-r " represents "resize", we have successfully extended the existing LV to 2 Gb.
(2) Creating of New LV :-
To do this, we will run the command lvcreate -L +<size>G <lv_name> <vg_name>

As you can see , I have successfully created a new LV and assigned 2GB from the VG.
Step-6 : The Conclusion:
Check the current status of all the items, you have checked in Step-1.

In conclusion, the Linux Logical Volume Manager (LVM) is a game-changer in the world of disk management. By using LVM, you have the flexibility to manage and allocate disk space in ways that were once impossible. Embrace the power of LVM and take your Linux systems to new heights of performance and efficiency.
Happy Learning :).
